Warlord’s Ruin Dungeon is the latest dungeon in Destiny 2 that has been added with the last season, Season of the Wish. Season 23 is the last season of Destiny 2 before it takes its route toward Episodes and this last dungeon holds multiple encounters with several rewards that players can earn by overcoming the encounters and completing the dungeon.
In this guide, you’ll find comprehensive information on the mechanics of each encounter, the locations of secret chests, recommended loadout tips, and details on the various rewards available, including Legendary weapons, Exotics, new Armor Sets, and more. Our goal is to empower you with the essential knowledge needed to successfully navigate through the activity and secure valuable loot within the dungeon.
Note: Immortalboost is now offering Destiny 2 Boosting services for Destiny 2 players at a very affordable price.
Preparation for Warlord’s Ruin Dungeon Guide
Opt for Solar weapons in line with the current Season of the Wish meta. The Sunshot Solar Exotic Hand Cannon stands out as a reliable choice and is widely favored for solo runs in the Warlord’s Ruin dungeon.
Ensure you bring precision weapons such as Sniper Rifles, which have seen a significant boost in effectiveness during Season of the Wish. Alternatively, consider employing Linear Fusion Rifles, taking into account the bosses’ abilities.
- For Warlocks, prioritizing the use of Well of Radiance remains crucial for overall survivability.
- Hunters stand to gain substantial benefits from the Celestial Nighthawk, thanks to its precision damage output during critical boss phases.
- It’s also advisable to have a Berserker Titan in your team to deliver damage to bosses in case of running out of ammo.
Warlord’s Ruin Dungeon – Walkthrough
In this section, we will discuss each of the three encounters. Included are thorough descriptions of all mechanics, buffs, and debuffs you’ll encounter, along with instructions on how to effectively deal damage to the bosses and secure victories in each encounter.
How to Unlock Warlord’s Ruin Dungeon
To complete Warlord’s Ruin, it is recommended to have a Power Level of at least 1790 for Normal difficulty and 1840 for Master difficulty. Additionally, a power level of at least 1810 is advisable to defeat the final boss on Normal difficulty.
Accessing the Warlord’s Ruin dungeon requires meeting specific prerequisites. Despite being introduced during Season 23, access is not covered by the Season of the Wish pass. You can unlock it through either of the following:
- Lightfall Deluxe Edition.
- Lightfall Dungeon Key (2,000 Silver).
The key grants access to both the Ghost of the Deep from Season of the Deep and the new Destiny 2 dungeon, Warlord’s Ruin, for Season of the Wish.
To initiate the process, start by picking up the quest “In the Shadow of the Mountain” given by Ikora Ray in the Tower. Once you have the quest, launch the dungeon by clicking on the dungeon node located on the far right in the EDZ.
Road to the 1st Encounter
In the initial section, there’s a jumping puzzle that requires traversal skills. If you advance and encounter a blockade, you’ve gone a bit too far. Simply backtrack and follow along the mountainside, with the red flags serving as a helpful guide.
You’ll eventually come across a chest, but be cautious — opening it spawns numerous mobs without any rewards. This trend of false chests is prevalent throughout the entire dungeon. Keep an eye out for an occasional blue glow or an ether effect around the chest to distinguish genuine rewards.
Continue along the mountainside, cross the bridge, and after facing enemies, you’ll reach the first encounter.
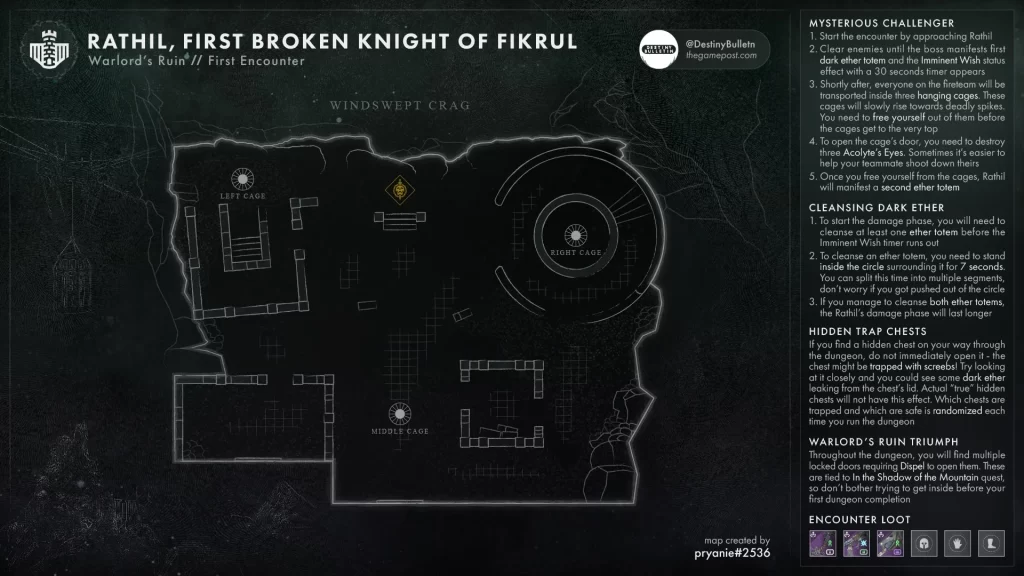
1st Encounter – Rathil, The First Broken Knight of Fikrul
Upon initiating this encounter, you’ll quickly observe the boss’s immunity. After engaging in combat with some enemies for a brief period, the boss will summon a Taken version of a Scorn Captain’s Elemental turret.
This turret must be dealt with, but before you can take any action, you’ll find yourself teleported into a floating metal cage. All three team members will be in separate cages scattered around the map. To break free, shoot the three blighted eyes that spawn around the cage. Once all three eyes are shot, the cage door opens, allowing you to escape. You can assist teammates by shooting their blighted eyes from a distance if they’re struggling to find one.
Upon returning to the main area, you’ll have some extra time, depending on how quickly you dealt with the blighted eyes, to handle the Scorn turrets. Stand within the white circle to complete the task—shooting is unnecessary; proximity to the circle suffices. The orb inside the circle will turn purple and be destroyed. Destroying the turrets grants a new buff called “Imminent Wish” with a countdown timer.
As the timer reaches zero, it transitions into a buff named “Naeem’s Wish Empowerment,” enabling you to damage the boss. The more turrets you destroy, the longer the duration of the Imminent Wish buff. The boss primarily engages in occasional stomping, allowing for the use of close-range weapons like swords or shotguns.
Once the buff expires, the boss becomes immune, and the sequence restarts. You’ll need to eliminate Scorn enemies, potentially be teleported into a cage, and then target the turrets to shoot the center. It’s crucial to be inside the white circle to inflict damage. The cycle repeats, and you might find yourself teleported into a cage again after destroying more Taken turrets.
However, each time you defeat the Scorn boss, you won’t immediately receive your loot. Instead, you’ll be teleported into a prison cell and must find a way to escape.
To successfully escape and claim your loot, carefully inspect the prison cell surroundings. Look for small circular objects positioned above doorways and in various locations. Shooting these objects initiates a counterclockwise rotation; shooting them again halts the rotation, and shooting once more changes the direction.
In a specific cell, you’ll find a lever to activate and six spinning gears. The code is determined by scratched numbers in select cells, with white indicating a clockwise spin and orange indicating counterclockwise. To input the code, a specific number of gears should spin clockwise, and the remainder should spin counterclockwise. After setting the code, activate the lever to test it.
Once released from the prison cell, retrieve your loot and prepare for a lengthy traversal section. Navigate through the Castle, encountering enemies intermittently and being wary of hidden floor holes and lethal spikes.
Stay alert for small vents along the walls that shoot out spikes when traversed. Jump over them if they are on the ground, crouch under them if they are elevated, and move to the opposite side of the wall if the vents are on one side.
Note the presence of false chests throughout the journey, recognizable by a faint ether glow. As you progress, you’ll reach a section requiring multiple jumps until you reach the outside of the Castle on the cliff side. Ascend, cross the bridge, and continue moving forward.
To enter the Castle, turn left and closely follow the structure’s side, leaping onto the protruding objects. Follow this route until you reach an open sewer. Leap in and continue progressing into the Castle, advancing towards the second encounter.
2nd Encounter – Locus of Wailing Grief
As you continue forward, you’ll enter an outdoor area where another enemy awaits. Initiating this encounter involves shooting the Taken orb at the Arena’s center, summoning a large Taken Ogre and commencing another boss fight.
During this task, multiple enemies will spawn in the center of the Arena, including yellow bar enemies like the Servile Minotaur mini-bosses, which should be prioritized for elimination. Killing these bosses is crucial as it triggers the appearance of other significant adversaries, as discussed shortly. Additionally, focus on defeating the blighted eyes.
Proceeding to the left side of the Arena and the right side, you’ll encounter sizable Scorn Captain mini-bosses. Eliminate them to acquire the Taken Scorn turrets from the initial encounter. Destroy these turrets by standing within the white circle and targeting the center.
Throughout this process, your screen will progressively blur, and the Biting Cold debuff will appear in the corner, reaching time 10 before causing a team wipe. To prevent this, utilize the pillars of flame located around the outskirts of the map. Approaching them grants Shelter From The Storm, rapidly reducing the Biting Cold debuff. Seek these objects to clear the debuff, allowing you to engage with Taken turrets, defeat bosses, eliminate enemies, or revive teammates.
Once the text “the Howling winds die” appears in the bottom left of your screen, the Biting Cold debuff is no longer applied.
Explore the arena to find a solar charge at the very center back. Picking it up grants the Burning Desire buff. Four stone pillars with metal tops are scattered around the boss arena. With the Burning Desire buff, interact with these pillars to light the beacons. Once all four beacons are lit, you can start DPSing the boss.
Crucially, a continuous storm will be in progress during the DPS phase. It is imperative to inflict damage on the boss from the beacons with Burning Desire, which also provides Shelter From The Storm.
As the boss draws nearer, it will extinguish the pillars one by one. After the first one goes out, reposition your team to the next one, DPS from there, and repeat the process for subsequent pillars. When lighting the final fourth beacon, ensure your entire team is present and hops into it simultaneously. Lighting two beacons simultaneously can lead to unnecessary damage since two teammates on different beacons waste one light. Thus, prioritize going from one beacon at a time as a cohesive team.
If your team fails to do sufficient damage to defeat the boss, you’ll need to repeat the entire mechanic.
A beneficial strategy involves sticking together as a team, despite Captains spawning on opposite sides of the Arena. By concentrating efforts on one side, the team can efficiently dispatch the Captain, destroy the turret, and move forward together. The other Captain will eventually move toward the center, where the team can swiftly eliminate it. This approach ensures the effective handling of enemies and Taken turrets.
Throughout the gameplay, it was observed that using a sword outside the lit beacons resulted in hitting immune targets. Conversely, the new seasonal Scatter Signal Fusion rifle, featuring a rapid-fire frame and controlled burst, proved to be an exceptional weapon for this encounter. It is effective at close range without the limitations associated with swords.
Now, let’s proceed to the final encounter.
3rd Encounter – Hefnd’s Vengeance, Blighted Chimaera
Upon navigating through the castle and the mountain cliff, you’ll eventually arrive at the door.
To access the Castle, backtrack through the door and locate the entrance. Inside, a large Taken sphere will be floating. Traverse the cliffside exterior to ascend. Along the way, you’ll encounter groups of enemies and face a challenging jumping puzzle after this group. Reach the top of the rock pillar, follow the light to maintain the right direction, jump across, and continue until you reach the final boss.
The boss, initially floating and immune, prompts you to continue climbing up the Castle. Upon reaching the tower’s top, you’ll confront the final boss encounter. Jump down, find the rally flag, and prepare for the encounter’s mechanics, which involve multiple elements.
Initiate the encounter by shooting the Taken Orb when the boss spawns. It will be immune initially, requiring you to stay on the starting platform. Enemies, including Scions, will spawn, and you must also be vigilant about the blighted eyes around the boss. Eliminate these eyes, and exercise caution regarding damaging blights in the surrounding area. Shooting the blighted eyes is essential, as proximity will cause ongoing damage.
Two Scorn Captain mini-bosses will spawn, presenting relatively easy targets. As before, defeating them triggers the Scorn turrets’ appearance, and it is advisable to stand near them to destroy the turrets.
However, another critical mechanic is the Hex of Vengeful Corruption debuff, with a timer of approximately 15 seconds. Reaching zero on the timer results in death. During the debuff, immune Corrupted Hex-Drinkers appear. Transferring the debuff to them requires dealing melee damage. They start glowing black, and if they melee you back while glowing black, the debuff persists. To avoid this, melee a white-glowing Hex-Drinker and quickly retreat to prevent them from retaliating.
Since you can’t kill the immune Hex-Drinkers, using a grenade or similar means to suspend them temporarily is effective. This provides a window to destroy the Taken turrets.
Destroying at least one turret and obtaining the Imminent Wish buff initiates a damage phase where you can finally harm the boss. Similar to the first boss, this phase is called Naeem’s Wish Empowerment.
The timer is tied to the number of turrets you manage to destroy. Taking out three or four turrets grants additional time to inflict damage on the boss. Time becomes crucial because there’s a white chunk in the boss’s Health that must be diminished to advance to the next phase of the Arena. Failure to lower it completely results in repeating the same phase in the same location.
However, if you successfully reduce the chunk entirely, the boss teleports to the previously inaccessible area, opening up new possibilities.
In this transformed setting, the blights vanish from the objects, providing platforms to reach the next section of the arena. The same mechanics repeat in this new area, leading to another chance to damage the boss.
After the third repetition, a significant change occurs. Instead of merely relocating, upon lowering the chunk for the third time, the boss teleports to the center of a debris ring.
While standing on the first third of the ring, focus on dealing maximum damage. Blighted eyes continuously spawn and become immune, prompting the boss to teleport. Assign one person to shoot the eyes to extend the damage phase; neglecting them will prematurely end the phase. After maximizing damage and managing the eyes, transition to the next third of debris for another damage phase.
Emphasize damaging the blighted eyes to maximize your impact. After each phase, a Taken goop appears, teleporting you back to the beginning. Repeat the process, navigating through mechanics and ascending to higher areas to inflict damage. Reach the top ring of debris for a substantial damage phase.
If you deal sufficient damage, a final stand mechanic triggers, teleporting you to a new area with spawning blighted eyes. Finally, you’ll vanquish Hefnd’s Vengeance, the Blighted Chimaera, and successfully complete the brand-new Destiny 2 Warlord’s Ruin dungeon.
Warlord’s Ruin Dungeon Secret Chest Locations
Between the second and third encounters, you’ll discover two hidden chests. Within a room boasting numerous chests, be cautious, as all but one are malevolent Scorn chests. Look out for the non-glowing blue chest, as it holds valuable dungeon loot.
Once you’ve secured the loot, venture outside and follow the right side of the mountain. You’ll quickly encounter another hidden chest in the open area.
Warlord’s Ruin Dungeon Loot Table & Rewards
Warlord’s Ruin Dungeon loot table consists of 4 Legendary Weapons, 1 raid Exotic Weapon, and Armor sets for each Guardian class.
Weapons Loot Table & Rewards
| Encounter | Boss/Vault |
|---|---|
| First Encounter | Rathil |
| Second Encounter | Locus of Wailing Grief |
| Final Encounter | Hefn’s Vengeance |
| Weapon | Type | Element |
|---|---|---|
| Vengeful Whisper | Combat Bow | Kinetic |
| Dragoncult Sickle | Sword | Kinetic |
| Naeem’s Lance | Sniper Rifle | Strand |
| Indebted Kindness | Sidearm | Arc |
| Buried Bloodline | Sidearm | Void |
Note: The table combines information about the encounters and associated bosses/vaults, as well as the weapons, their types, and elemental attributes.
Armor Loot Table & Rewards
The Warlord’s Ruin Dungeon rewards with a Dark Age Armor set per class.
| Slot | Titan Armor Set | Hunter Armor Set | Warlock Armor Set |
|---|---|---|---|
| Helm | Dark Age Helm | Dark Age Mask | Dark Age Visor |
| Arms | Dark Age Gauntlets | Dark Age Grips | Dark Age Gloves |
| Chest | Dark Age Chestrig | Dark Age Harness | Dark Age Overcoat |
| Legs | Dark Age Sabatons | Dark Age Strides | Dark Age Legbracers |
| Class Item | Dark Age Mark | Dark Age Cloak | Dark Age Bond |
This layout provides a clear and organized representation of the Titan, Hunter, and Warlock Armor sets with their respective slots.
Warlord’s Ruin Dungeon Exotic Items
Last but certainly not least, you’ll find a new Exotic Ghost Shell, Zira’s Shell, along with a Catalyst for Buried Bloodline and two exclusive emblems that can be earned in this dungeon. Furthermore, a brand-new title for the Destiny 2 Warlord’s Ruin dungeon, Wrathbearer, promises plenty of entertainment for the weeks to come.
Can You Farm Warlprd’s Ruin Dungeon?
Warlord’s Ruin is farmable for unlimited loot, enabling multiple runs each week. However, it’s essential to note that, consistent with the pattern seen in other Destiny 2 raids and dungeons, the Warlord’s Ruin Exotic can only be farmed once per character per week.
That is all related to the Warlord’s Ruin Dungeon of Destiny 2’s last season, Season of the Wish.