Creating a custom lobby in Deadlock can be tricky but we got you covered with an in-depth guide on how to create a custom lobby. We will guide you in detail by accessing the command console and guiding you about the match configuration settings. Moreover, helping you with how to invite your friends and players into your custom private match in Deadlock.
However, creating a custom lobby in Deadlock can be confusing as it’s not a straightforward process but we have defined a step-by-step guide to help you in create a custom party.
Valve has finally given access to Deadlock Hero labs to players for a limited time. You can now access the new heroes that are in development. Valve is famous for character designs. And they are not stopping getting updates for Deadlock. They are developing seven new heroes that will be made part of the official roaster soon. You can now try out these new heroes with Deadlock Hero Labs.
Deadlock is the latest title from Valve currently in Early Access and it already made a name for itself, climbing the number of players with over 100,000 every day on Steam. The hero shooter mechanics mixed in a MOBA playstyle surprisingly blend together well, allowing players to experience a new genre of casual and competitive game.
Here’s everything you need to know about how to creat a Custom Lobby in Deadlock by following this guide.
How to create a Custom Lobby in Deadlock
You can follow these steps in sequence to create a custom lobby in Deadlock and invite your friends to play a private match with you.
1. Accessing the Command Console
- To create a custom lobby, you need to open Deadlock’s console command. Press F7 (or your bound key) to bring up the console.
2. Creating a Private Lobby
- Type private_lobby_create into the console. This command will open the custom lobby screen.
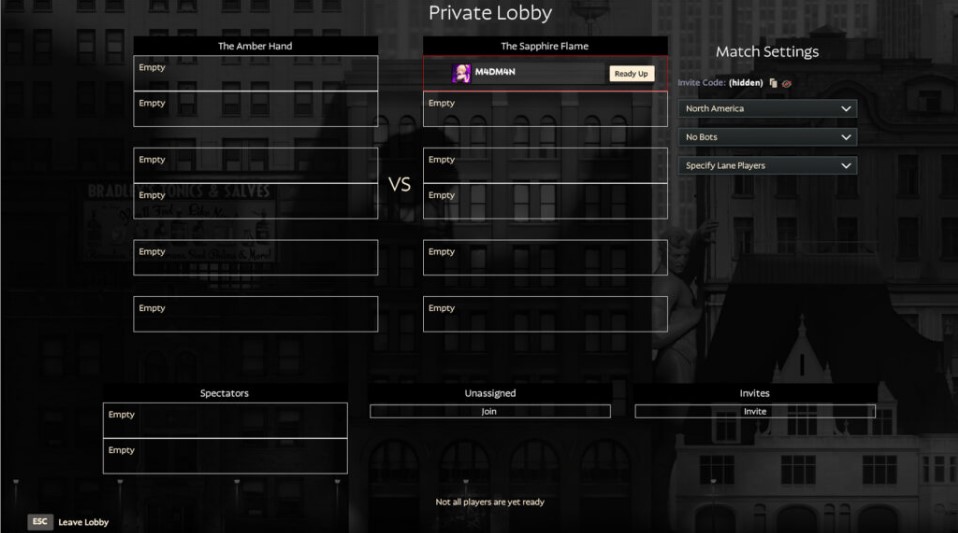
3. Custom Lobby Setup
- Once you’re in the lobby screen, you can assign players to one of the two teams:
- The Amber Hand
- The Sapphire Flame
- Each team can hold up to 12 players. Simply click on an empty slot to place a player in a team.
4. Configuring Match Settings
- On the right side of the screen, you’ll find match settings where you can:
- Select which server to host the lobby.
- Choose to play with or without bots, offering difficulty levels of easy, medium, and hard.
5. Inviting Players
- You have two options to invite players:
- Direct Invite: Send invitations through your friends list.
- Invite Code: Share the lobby invite code found in the match settings.
6. Spectators and Unassigned Slots
- There are two spectator slots for those who wish to observe the match.
- Unassigned slots are available for players who aren’t playing or spectating but are still in the lobby.
7. Starting the Game
- Once all players (including spectators) are ready, they must press the ready button.
- After heroes are picked, click the start match button to begin the game.
That’s all you need to know about how to create a custom lobby in Deadlock to play with your friends.